A WIcked Workshop…

Not long ago, I ran a jewellery -making workshop for some very lovely Bath WI ladies…

20140723_212704

BtTM7aJCYAEz3P4.jpg large

It was held at one of the members’ houses, who had gone to lots of trouble to make sure there were drinks and snacks for everyone. Even with some rain just before I arrived, it was very hot and sticky, so those ice cold drinks were much appreciated!

It was a really fun evening, and, with a little bit of concentration…

BtTNSLPIcAAr33T.jpg large

… and some helpful tips from me…

BtTNoSBIQAE_5Rz.jpg large


…the ladies all made some really lovely earrings!


20140723_213152

If you would like to have a go at jewellery making, just get in touch!

I do workshops for:

– groups of friends or families

– social groups

– hen parties

– children’s/ teenager’s birthday parties

– fun summer holiday activities for kids

– groups with learning difficulties and/ or disabilities

– children’s groups, like Girl Guides or youth groups

Making jewellery, making beads, fabric jewellery, using shrink plastic, and other crafts…

Or, if you have an idea for a workshop, I’d love to hear what you fancy doing!

Any questions?

Email: made_by_sami@hotmail.co.uk

Tel/ text: 07900381921

Get in touch on Facebook


Love,

Sami x


PS… Interested in joining the Bath WI?

Go to their Website, Facebook, or Twitter 🙂

A Difficult Decision…

I’ve had to make a difficult decision lately, which has broken my heart a little bit…

After nearly 4 years of Made by Sami, I have decided to stop selling my jewellery online.

I’m planning on continuing:

– running workshops in the Bath/ Bristol area

– selling DIY kits, supplies and tool on my Etsy shop

– my blog


All the jewellery that I have made will be on offer at sale prices from now until Christmas (around 50% off the ordinary price). After Christmas, my jewellery will no longer be available to buy online, although I will continue to take commissions for previous customers, friends and family after this point should that special gift be needed!

Making this decision has been very difficult to me; it’s very easy to see this as a defeat, or a failure. However, I am choosing to concentrate on the part of Made by Sami which is most sucessful and most enjoyable to me; this can only be a positive, and will hopefully mean I can dedicate more time and effort to making my workshops even more brilliant!

Love,

Sami x

Trust in an Untrusting World…

Every so often, someone does something that restores your faith in humankind. You know the kind of things… strangers complimenting you, friends showing their amazing loyalty, nice surprises and kind words when you need it the most. One world where you don’t expect this is the Retail world; it’s there to make money, and this often takes top priority.

HOWEVER…

Let me tell you about a little sewing shop in Bath city centre where trust, kindness and generosity rate pretty high on that list. It’s my favourite haberdashery shop, and I would feel guilty shopping anywhere else unless I had to. It doesn’t look like much from the outside, and looks like any ordinary sewing shop from the inside. But the small acts of trust and generosity that this shop and its owner have demonstrated to me and Big Sis have shown me that it’s a pretty fab place.

I’m not going to tell you what they trusted me with, or how they were generous, as I would hate for others to abuse this trust. Although I reckon you lot are pretty splendid, the Internet is a big bad place. So, let’s just say that, if you need any fabric, sewing supplies or machines, or want to do a workshop, then this is the place to go.

The shop is on Charles Street, just up the hill from Green Park Station. You’ll spot the rolls of material outside…

Love,

Sami x

Sewing Time…

Hey!

Time to share one of my latest makes with you…

I love sewing. However, I love sewing when it’s really easy and I know what I’m doing! So, I decided to push myself with my latest project, and work on something out of my comfort zone.

It had INSTRUCTIONS and everything :s


So, to lower the stress levels, I decided to do a more complicated project but for a non- important item. So here is my peg bag:

Image

Image


Image

I got the instructions from this site, and used the sizes for a kid’s messenger bag, to make sure it was small enough for a peg bag. The material was some old curtains that my sister gave to me. I’m pretty happy with it really- I feel quite swanky hanging out the washing now!! 🙂

Have you made anything out of your comfort zone lately? Lemme know in the comments, on Facebook or by emailing made_by_sami@hotmail.co.uk

Love,

Sami x


… And More Lists!

In my last post, all about To Do lists, I shared a few ideas about how to present your To Do lists if you’re a list-maker like me!

And here is the way I’ve chosen to do it…

ImageImage

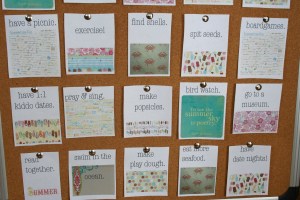
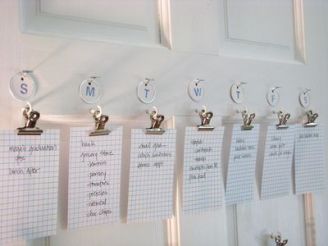
So, I have a daily plan, a weekly plan, and a general To Do list!

They are covered in sticky back plastic (I should have been on Blue Peter!) so that I can write on them with non-permanent pens, and are hung using some wooden trouser hangers that my sister was going to throw away.

Want to have a go yourself?

How to Make Planning Boards:

You will need:

– Canvas boards/ mount board/ thick cardboard (I used canvas boards, £1.50 from The Range)

– Permanent marker and fineliner

– Pencil

– Ruler

– Sticky back plastic (I got mine from Wilkinsons)

– Trouser hangers (or you could use string with bulldog clips)

– Design


To Make:

1. Draw out your design on the boards. I have some pencils marks that I can’t get rid of on my canvas boards, so be careful and try to mark bits that will get covered up! Use a ruler to measure out your boxes, borders etc (I went a bit freehand to create a homemade look, but measured first)

2. Use your permanent marker and fineliner to go over your design. Keep it simple, but add little details (like my buttons) to make it more interesting.

3. Leave the pen to dry completely before rubbing out your pencil lines. I waited overnight to make sure.

4. Cover your boards with sticky back plastic, folding the edges over onto the rear side of your boards.I taped over the edges on the back of my boards with clear parcel tape, to make sure the sticky back plastic doesn’t peel away over time.

5.

If you are using trouser hangers…

Peel the back off a piece of sticky back plastic (just less than the width of your board, and about 15cm long.) Fold about 4 cm down at the top (don’t worry about bubbles, you won’t see this bit when it’s all finished) and stick it to the back of your boards so that a 2cm tab is sticking out above the top of your boards. I again strengthened this on the back with paarcel tape. Clip the trouser hanger to the tab and hang up!

If you are using string and bulldog clips…

Clip the bulldog clips to the top of your board, one in each corner. Thread your string through the hole in the clip and tie in a knot or bow. Do the same on the other side to create a loop. Hang up on a nail!

6. Finished! Now you can use non-permanent/ whiteboard pens on the boards to write all those important jobs!


Please send any photos of your designs to made_by_sami@hotmail.co.uk and I will feature them on my blog.

Love,

Sami x

Lists, Lists, Lists…

I felt like I was killing a whole tree every year because of the amount of lists I make.

The Boy always tells me that I “love making lists”, and it’s completely true. I love the satisfaction of ticking jobs off lists; I love starting a day by making a plan, and realising how much I could do if I didn’t faff around; and I love finishing the week knowing that I haven’t neglected any Very Important Jobs. Maybe it’s OCD, maybe it’s a middle finger to “Unorganised Sami of the 90s.” Whichever one, I’m a list-maker and PROUD!

In this post, I’m going to share a few interesting ways to make and use lists with you. In my next blog post, I’ll let you know which method I chose.

#1

Pen and Paper.

The original; simple and straightforward, no-nonesense list making!

list

#2

Use a Template

There are some really fab templates out there. Just google “To do list templates” or check out Etsy for some great printable ones. Or, if you’re a fancy Graphic Design type, rustle one up yourself.

il_570xN.373244096_iltg#3

Take up a Whole Wall

I love this wall-sized Summer To Do List:

IMG_0990

 It’s great idea for more long-term goals. If you don’t have the wall space, how about creating a box of things you would like to do, then picking 1 or more at random every week to put up and complete. A similar idea is the “I’m bored” jar:

index

#4

Make it Visual

You could either ONLY use pictures/ doodles, or use a more visual layout like a mind map…

visual-list

#5

Use Technology

I’m not going to pretend to know anything about techy To Do lists (I suppose I should put “research techy To Do lists” on my To Do list, but I’m not going to.) However, loads of people use iphone/ android apps like Orderly and Google Keep, and others use good ole Excel spreadsheets, so they must be pretty good!

mza_3605955759368002519.320x480-75

#6

A Notebook or Diary

Nearly as simple as the pen and paper idea, diaries and notebooks have been keeping us organised for generations.

images

#7

Chalk It Up

There are some pretty lovely chalkboards for sale at the moment, or why not buy a pot of chalkboard paint and turn pretty much any surface into a chalkboard yourself. They might not be suitable for carpeted spaces, but are brill for kitchen shopping lists or hallway To Dos.

DSC03605

#8

Post-Its and Pegs

Another gret idea is to  use post-it notes, clips and pegs to create throw-away To Dos; write your job on a note, then scrunch it up and chuck it in the bin when you are done! 100% satisfaction guaranteed.

5afb2d59367a9d5e051253eb5a7f06ce

Hopefully that’s given you some ideas. I would love to know what your To Do list looks like, or if you use any of the methods above. As I wrote earlier, I will tell you which one I picked in my next blog post…

Love,

Sami x

Sami’s Adventures with Shrink Plastic #1

I have been wanting to have a play with Shrink Plastic for aaaages now. For those of you who don’t know what it is… It’s plasticky paper sheets that you draw on, cut up, punch (hole punch, not fist punch!), ink, colour in, whatever really. THEN you put it into the oven and watch as it crinkles up and shrinks down and thickens up, into a little piece of strong plastic. It’s a bit like magic.

Here are some (bad) photos of my first few late-night attempts. I was too excited to focus on taking proper photos, soz:

Image

ImageImageNOTE: I put the pen there to show the size change- it’s not a weird Shrink Plastic design.

I was hoping to make the little row of house into a necklace, but I didn’t realise til afterwards that Shrink Plastic is reeeally light, so it wouldn’t hang the right way round (I would need to put the holes near the top, and even then it would be a really light necklace). It’s quite comfy as a bracelet though.The button turned out a bit weird, but I’m going to experiment with that one. And the “Sami” one went a bit Pete Tong, because the holes were too near the edge.

Oh well, it was a really fun evening, and I’m sure I’ll carry on practising! I got my Shrink Plastic from The Range and it was pretty cheap (£1 per A4 sheet). You can also use it with stamps (or trace?) if you’re not keen on drawing your own designs.

I’ll post more pics when I have another go!

Love,

Sami x

From Little Seeds Grow Mighty Trees

A few weeks back, I was asked by a work friend (Mrs S) to make a special picture for her son’s Naming Party (like a Christening but non-religious). I have to be modest here; Mrs S had the idea and sent me pictures, I just mashed it all together and brought her ideas to life.

Still… it was a pretty fun project for a gorgeous little man and his lovely family.

Pics? Go on then…

Image


ImageMrs S wanted her cute little cats in there too, and picked the colours of the bunting to go with Finley’s nursery.

ImageImageI made a little sign for the day. The idea was that everyone (big or small) would leave a fingerprint on Finley’s tree. The finished picture is below, with all the fingerprints added:

Image

I was really happy with how it turned out, and it was so nice to see everyone adding their fingerprints on the day. The day itself was lovely; beautiful sunshine, lots of cake and scones, and a catch up with work people. And Finley’s smiles of course. Oh, those smiles!!!

Love,

Sami x


PS… If you would like to order something similar, please contact me by emailing me: made_by_sami@hotmail.co.uk or messaging me on Facebook. Prices depend on the design, size and framing, as well as postage, but asking is free, so please don’t hesitiate to get in touch 🙂


A Ton of T-Shirts…

A couple of years ago I decided to make a rug. But I wanted to achieve 2 goals:

– for the rug to be absolutely FREE

– for it to be made of only items that would have been binned

It took me aaaages, but…

Image

Image

Image

…Isn’t it lovely?! I’m so proud of myself; even The Boy likes it! Plus, it was absolutely free, and saved all those tshirt pieces from going into landfill. So, all in all, I feel pretty damn proud of myself!!


Love,

Sami x


PS… I’m going to attempt to show you how to make it in my next blog post, so keep an eye out (or subscribe!) if you want to make your own!x

A Quick Commission…

You might remember my post a while ago about how much I love to do commissions for people. If not, you can read it here.

Anyhu, here’s my latest, some bridesmaid jewellery for my friend and ex-housemate Rosie…

ImageImage

Image

Image

Image

What do you think?

Love,

Sami x

PS… need a commission? Let me know by emailing made_by_sami@hotmail.co.uk . I don’t ask for any money before the design is finalised and you’re happy with the price; chats are free! So don’t hesitate to get in contact if you need a unique present, a piece of jewellery for a special occassion, or something you just can’t find on the high street!

One Very Busy Sewing Bee…

I managed to catch up with the final of the Great Bristish Sewing Bee this week. LOVE that programme! It’s so nice to have a stress-free show to watch, which doesn’t try to be anything but… nice!

Nice is good sometimes 🙂

Image

On another note, how did Chinelo Bally have time to BLOG when she was on Great Britich Sewing Bee?! Wonder woman!

Although I completely adored posho winner Heather by the end of the competition, Chinelo was definitely my favourite. So I thought I’d check out her blog here. It’s full of sewing instructions to keep you busy if you’re after your next project.

Image

Me? I’ll stick to my patchwork cushions for now, til I feel a little braver!

So, did the best woman win?! Leave your comments below…

Image

Love,

Sami x

Home is Wherever I’m With You…

*LOVEY DOVEY POST ALERT*

So… in February, me and The Boy celebrated 5 years of romantic dates, hysterical laughter, blazing rows (come on, no-one’s perfect), and millions of kisses. To celebrate, we went out for dinner and swapped pressies.

I got some amazing ceramic button coasters (which I wrote about here).

He got a handmade picture…

Image

Like it?!

It was all made in TOP SECRET conditions, obviously…

Image

If you want to make one similar, here’s what I did:

1. I drew out my design (on paper which would fit into my frame)

2. I traced my design onto water soluble film (can’t remember where I got mine from, but it’s this kinda stuff)

3. I then pinned the film on top of my materialImage4. I used a plain black stitch to trace over my design, sewing through both the film and fabric

Image5. I then washed away the film with water, and left it to dry

Image6. When it was dry, I embroidered a heart onto the material in red embroidery thread (I did this by hand using an embroidery thread)

7. I ironed the material, and then put it in the frame. Ta da!

Image

ImageWe hung it in pride of place above our bed. Wish I’d made it a little bigger, but I think it’s cute, and The Boy seemed to like it, so that’s all that matters!

If you have a go at something similar, please send me a photo to: made_by_sami@hotmail.co.uk. I’d love to see it 🙂


Love,

Sami x

Hello, Lovely Weekend…

Hello all.

Hope you all had fab weekends.

What did I get up to?!

Well, it all started with a pampering session on Friday at The Art Team Bath, where I got my hair done. I went there as I’d signed up for an offer, and i’m so glad I did- I got a cup of tea on a little tray with a flower, a head massage, and the (lovely) hairdresser curled it beautifully for me at the end. So happy with how it turned out…Image

After a few weekends of extreme laziness, which included pyjamas, blankets, Netflix, tea and eating, me and The Boy decided to make the most of the Spring sunshine on Saturday, so we headed over to Bath after a lie-in (you need a smidgen of laziness on a Saturday!). We went for food at The Globe first, which was yummy. Then, we went into town to visit a vintage fair i’d heard about on Facebook.

It was really lovely; jam-packed with loads of vintage/ vintage-inspired clothes, jewellery, accessories and homeware. I was fairly restrained (I coulda spent a fortune!) and only bought some pretty little Taunton Vale ceramic jars with the most adorable blue and yellow pattern. Had to buy all three (otherwise i’d feel like I had split up siblings!), and they look great on top of my wardrobe. This is my new favourite place to (temporarily) put all the pretty things I like to look at but aren’t sensible Boy Things! I bought the dartboard from a charity shop a few weeks back, and the Cath Kidston sewing house was a present from my parents:

ImageOh, aren’t they adorable!!!!! And they were £18. I think that’s a bargain. 😀

We topped off the afternoon with afternoon tea and a visit to the car wash. Glamorous!!

ImageWith Sunday came more cake (this time homemade Rhubarb and Lemon Cake):

ImageIt’s yummy.

Hopefully you’ll comment to say how your weekend was (one word will do if you’re not a writer!), or send me a link to your blog (it gets lonely here by myself :P)

Have a good week!


Love,

Sami x